首先3d-force-graph在碼云或者github直接搜索�,它的文檔確實有點少。這個插件用了3次�����,每一次都有不同的痛苦����,也有粗心大意所導致的。
好的���,我們現在講解一下這個插件中的導向樹DAG模式
我的案例都會基于Vue開發�,創建項目等等我們進不說了��,進入正題。
步驟:1.安裝:npm i 3d-force-graph (我安裝的是"3d-force-graph": “^1.67.5”,)
2.導入 import ForceGraph from ‘3d-force-graph’;
首先注意點:
1.不要全部cv我的代碼����,或者光放文檔中的代碼,我們要依據后臺數據實際看問題���,但是基本的代碼步驟是差不多的�����,但是也不要全CV����,不然你的瀏覽器會報錯��,而且你以為錯誤是你的邏輯問題���,實際上是cv多了的問題(這一點使我耽誤了半天的時間)
2. 數據處理設計到了遞歸等���,數據接口我就不寫了
在模板中定義:
<template>
  <div class="wrap"></div>
</template>
import ForceGraph from '3d-force-graph'; import { subjectList } from '../src/request/api';
data() { return { sourceData: null, nodes: [], links: [], ForceGraphData: {} }; },
初始話完成
async created() { try { const { data: res } = await subjectList(); this.sourceData = res.data; console.log(this.sourceData); } catch (err) { console.log(err); } this.digui(this.sourceData); this.SetForce(); },
-
1
-
2
-
3
-
4
-
5
-
6
-
7
-
8
-
9
-
10
-
11
-
12
進入數據
methods: { digui(data) { data.children.forEach(item => { if (item.children) { this.digui(item); } const nodeObjs = {}; nodeObjs.name = item.name; nodeObjs.id = item.id; nodeObjs.level = item.level; nodeObjs.parent_id = item.parent_id; nodeObjs.has_children = item.has_children; const linksObjs = {}; linksObjs.source = item.parent_id; linksObjs.target = item.id; this.nodes.push(nodeObjs); this.links.push(linksObjs); }); },
-
1
-
2
-
3
-
4
-
5
-
6
-
7
-
8
-
9
-
10
-
11
-
12
-
13
-
14
-
15
-
16
-
17
-
18
-
19
-
20
-
21
后端返回的數據是格式我們需要用遞歸地方法把他們處理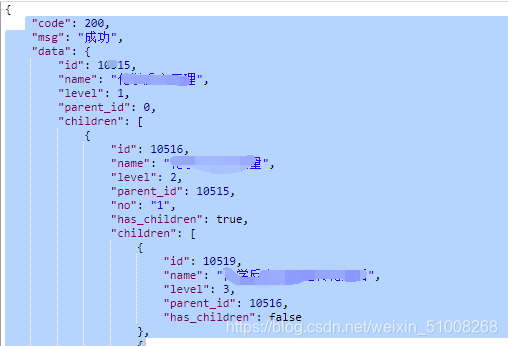
要知道插件的節點是nodes數據,連線是links數據��,links數組中的每一項都有source和target����,source的是連線的開始端�,target是連線的結束端�,source的是parent_id,target的是id,也就是依據數據進行連接����,這一不懂的話可以看看這個插件的這個案例

好,繼續�����,處理完的數據是nodes數據后端數據返回的每一項包括children下的每一項�����,links數據是每一項是的target:id和source:parent_id
處理數據完成���,下一部在methods中設置力導向圖的函數
SetForce() { this.nodes.unshift({ id: 10515, name: '化學', level: 1, }); this.ForceGraphData.links = this.links; this.ForceGraphData.nodes = this.nodes; const gukergForce = ForceGraph(); gukergForce(document.querySelector('.wrap')) .graphData(this.ForceGraphData) .dagMode('td') } },
-
1
-
2
-
3
-
4
-
5
-
6
-
7
-
8
-
9
-
10
-
11
-
12
-
13
-
14
-
15
-
16
-
17
-
18
-
19
-
20
現在一個簡單的力導向樹就出來了,隨項目的需求你可在節點加圖片���,你需要import * as THREE from ‘three’;這個包不用下載���,直接導入就可以,
const gukergForce = ForceGraph(); gukergForce(document.querySelector('.wrap')) .graphData(this.ForceGraphData) .dagLevelDistance(70) .dagMode('td') .nodeResolution(50) .nodeThreeObject(node => { .nodeThreeObject(node => { if (node.level === 1) { console.log('你好'); } let imgTexture = ''; if (node.level === 1) { imgTexture = new THREE.TextureLoader().load(require('./assets/1.png')); } else if (node.level === 2) { imgTexture = new THREE.TextureLoader().load(require('./assets/2.png')); } else if (node.level === 3) { imgTexture = new THREE.TextureLoader().load(require('./assets/3.png')); } else if (node.level === 4) { imgTexture = new THREE.TextureLoader().load(require('./assets/4.png')); } else if (node.level === 5) { imgTexture = new THREE.TextureLoader().load(require('./assets/5.png')); } const material = new THREE.SpriteMaterial({ map: imgTexture }); const sprite = new THREE.Sprite(material); if (node.level === 1) { sprite.scale.set(50, 45); return sprite; } else if (node.level === 2) { sprite.scale.set(20, 20); return sprite; } if (node.level === 3) { sprite.scale.set(30, 30); return sprite; } if (node.level === 4) { sprite.scale.set(20, 15); return sprite; } if (node.level === 5) { sprite.scale.set(20, 20); return sprite; } }); }
-
1
-
2
-
3
-
4
-
5
-
6
-
7
-
8
-
9
-
10
-
11
-
12
-
13
-
14
-
15
-
16
-
17
-
18
-
19
-
20
-
21
-
22
-
23
-
24
-
25
-
26
-
27
-
28
-
29
-
30
-
31
-
32
-
33
-
34
-
35
-
36
-
37
-
38
-
39
-
40
-
41
-
42
-
43
-
44
-
45
-
46
其實由誰解決了它節點之間不重復的問題����,可以給我留言��,謝謝
轉自:csdn論壇
藍藍設計建立了UI設計分享群����,每天會分享國內外的一些優秀設計����,如果有興趣的話�,可以進入一起成長學習,請掃碼藍小助��,報下信息��,藍小助會請您入群��。歡迎您加入噢~~希望得到建議咨詢��、商務合作�,也請與我們聯系���。

藍藍設計( www.syprn.cn )是一家專注而深入的界面設計公司�,為期望卓越的國內外企業提供卓越的UI界面設計��、BS界面設計 ���、 cs界面設計 ���、 ipad界面設計 �、 包裝設計 ���、 圖標定制 �、 用戶體驗 ��、交互設計����、 網站建設 、平面設計服務